Potential Projects

Sunday, May 15, 2011

A Tasty Meal

So despite the lack of pictures, I have been eating some pretty tasty food lately.  Like this:

Tasty Chickpea Wrap

This chickpea wrap comes from Supernatural Everyday, a cookbook that I recently purchased and am IN LOVE WITH!  More on that later....

First, a recent dinner I made inspired by a whole host of blogs, that was super tasty!

First, I made us a tasty salad, inspired by a recent post on Dana Treat:

I took some ho-hum looking tomatoes:

And roasted them so they looked like this:


And then added them to a lovely greek salad:

I then got all inspired by Shutterbean's Killer Garlic Bread:
The little one liked it too!

And we rounded out the meal with Spaghetti Bolognese from Lucinda Scala Quinn's book, Mad Hungry, which I currently have checked out from the library:

Overall it was an awesome meal.  Highly recommended.  If you make any of these recipes, let me know what you think!


Thursday, May 12, 2011

Sewing Projects

Hi friends,

I'm glad you've stuck around.  Despite the lack of blog posts in the last few months.  I have been very busy.  In particular, I've rekindled my relationship with my sewing machine.

www.4-h.org.png

I started sewing as a kid when I was in the 4H sewing club.  Did you have 4H when you were growing up?  For me, it was what all the kids on the farm were doing.  I credit it with turning me into a feminist.  I watched my mom do all the hard stuff the guys were doing (driving tractor, birthing cows, staining the deck, etc) but she also knew how to do all kinds of other stuff (sew curtains, make really tasty food, make you feel better when you were sick, etc).   When I was little, 4H was just about sewing club, and cooking club.  As we got older, we got to raise and show animals.

I was kind of a miserable failure in the 4H sewing club.  I'm pretty sure I didn't finish my first project.  I was always much more interested in cooking.  It became my creative outlet at a pretty early age.  Then 2 years ago I had a kid, and it seems that my ability to get creative in the 20 minutes between when I get home from work and when a full-blown tantrum starts (!) is really limited.  So I started to sew.

Sewing has been a huge creative outlet for me.  I can do it after Elliott is asleep.  I get alone time, and a creative channel that has no time crunch.  Here's a peek at what I've been up to, and where you can find more inspiration if you're interested:

Travel Car Mat

I became re-interested in sewing when I discovered some crafty blogs that I really liked.  After a few projects from various blog posts, I decided to buy the book "Stitch by Stitch" by Deborah Moebes.  I can't say enough good things about this book.  I've been working through it project by project, and I love it.  I have learned A LOT.  One of the early projects she has is a make your own place mat.  I did that, and then decided to switch it up and make a travel car mat as a birthday present for Elliott's little BFF.  The mat has pockets for matchbox cars, and I bought fabric so Z could drive his cars up and down all the roads.  Rumor has it that he likes it.  I figure it's good for restaurants and airplane rides.  Or trips to the doctor's office.

Elliott's Birthday present


I made Elliott this beanbag chair for his birthday!  Seriously I am really proud.  It turned out great, and he loves it.  I think we play with it every day.  I bought the pattern from MADE (another all time favorite blog).  That pattern is great and worth every penny.  Dana has tons of pictures, and again, I learned so much from making this!    

Also, if you're curious, this fabric is called "Hello my Friend" and it's made by Push Pin for Kokka.  (A Japanese import fabric).  I bought it from SuperBuzzy, but it's now out of stock.  You may have luck on Etsy.  

Happy Birthday Tyler!

Next project was a sweet little monster bag for another one of Elliott's BFFs.  This little bag holds a coloring book or two, and has color crayons for teeth.  I found this inspiration during "Celebrate the Boy" month on two of my favorite blogs:  Made by Rae and MADE.  You can find a link to the tutorial for this bag here.

Happy Birthday Chris!

Here's my most recent project.  Also inspired by a blog post during Celebrate the Boy.  I've personally never played Angry Birds, but I hear it's addictive.  Our good friend Chris seemed to really like the game, so I whipped these little guys up for his birthday.  You can find a tutorial for them here.  If you like Angry Birds, she has tutorials for all the characters.  I just made two.  I'm still trying to figure out how I'm going to throw these at Chris in order to give him his gift.  

That's what I've been up to.  Happy Crafting!

Monday, May 9, 2011

Patio Herb Garden

Hello again friends!  My apologies for a long absence.  First I lost the charger for my camera.  Which I stubbornly refused to replace for 2 months.  Then I found a badillion and one things to do besides blogging.  But I made this cute little herb pot, and took a few pictures, and thought you might like it.  That's right, dear reader, I missed you.


Growing herbs on your deck can be easy and fun.  I love being able to add fresh herbs to a recipe without paying $3 for a silly little box of herbs at the grocery store.  In fact these herb starts (which often have even more herbs than those silly boxes), cost anywhere from $1.50 to $3!  But they'll last all summer, and maybe into winter!  

I heard about growing herbs in a strawberry pot a while ago.  In fact, I first made an herb pot like this about 8 years ago.   This year I decided to dump out all of my soil and start fresh.  Some years I've been really lucky and had some of my herbs last all winter (during mild winters when I've kept my herb pot close to my house where I figure it's a bit warmer and more sheltered).

If you'd like to make yourself an herb pot (or make one as a gift!--that would be truly lovely!),  here's some basics:

Start with a basic strawberry pot.  I bought mine 8 years ago for about 20 bucks.  You may be able to find them for free on Craigslist, or ask around at the office or church.  Often times people like the idea of growing strawberries, but give up after the first year.  Just take that pot off their hands!
Empty Strawberry pot and some potting soil

Then you'll need to buy some herb starts.  For various reasons, in the course of a week I ended up at 2 local nurseries (Flower World, and Molbaks) and then also spotted some starts at my local fruit stand.  I love all 3 of these places, and I also recommend supporting your local plant sale.  Often times they're fundraisers for local non-profits.  And we know I love those.  


Once you have your pot and your starts, you'll need soil.  I dumped out the old dirt from my pot into a large empty pot (you could use a bucket) and mixed it with new potting soil, and some compost.  I also added some water to make the soil moist.  Once I'd mixed it up fairly well I added soil to the bottom of the strawberry pot to bring it up to the first level of openings.  
Hello Thyme

My herb starts were a lot bigger than the openings, so I gently pulled soil off from the root ball until the herb fit into the opening.  I then added a little soil around the herb from the front and the back.  I also added some slow-release fertilizer behind the root ball.

View from the top as I'm adding fertilizer

Keep adding plants!  Once you have the bottom layer all planted, add more soil until you reach the second layer.


I planted Oregano, Marjoram, Thyme, Sage, Dill, and Rosemary.  I'm going to plant (from seed) the entire top of the strawberry pot with Basil.  That still left me 3 openings.  In the past I've planted other herbs (mint, cilantro, lemon thyme, thai basil, etc).  This year I was tempted by all the varieties of strawberries that my local fruit market was selling, so I decided to buy 3 and give my strawberry pot a layer of tradition.  


There you go!  Easy and fun herb garden.  No need for a big garden space.  Have fun!


Friday, February 11, 2011

Panda Cupcakes


Aren't these little panda's cute?

OK, time to admit a few things.  First off, my camera's battery is dead.  And I can't find the charger!  One of those many moments when that nagging little voice rings in my ears "Isn't this the year you were going to get organized?"  Oh well.  Maybe next year....

So I took this picture with my old camera.  And I only realized after I had all the pandas assembled that I should have taken pictures.  I suppose I wasn't thinking they would turn out so cute!  So sadly all you have is finished product pictures.  Sorry!  But they were relatively EASY.  And fun!

I found the "recipe" and procedure in the book Hello, Cupcake!
Hello, Cupcake!: Irresistibly Playful Creations Anyone Can Make

I found this book used at Third Place Books and as soon as I saw the Pandas, I knew I would buy it and make them for my friend Lisa's birthday.  Lisa loves all things Panda.  Now I found this book last March, and her birthday is in February, so I've been having fun for months thinking about her birthday panda surprise.

For those of you who know me, I very rarely make anything from a mix.  But Hello, Cupcake! is all about using store-bought ingredients to make really cute cupcakes without a lot of work.  And although I originally planned to make cupcakes and frosting from scratch, in the end it saved me tons of time to buy store bought ingredients.  

To make the Pandas, I baked up 8 regular size cupcakes and 8 mini-cupcakes using a vanilla cake mix.  You could have made 16 pandas with that amount of cake mix, but it was also Superbowl Sunday, and my pants were already feeling tight.  I made the Panda faces first.  A mini-marshmallow helps make the snout, and then it's a simple matter of adding black food die to some vanilla frosting to create the eyes, nose and snout.  Hello, Cupcake! gives really clear directions on how to use ziplock bags to pipe on all your frosting.  It suggests using Oreo Os for ears, but I never did find those, so Chocolate Cheerios worked for me in a pinch.  The Panda fur on the big cupcake is made up of Oreos that I pulsed up in my blender.  Oreos also make up the arms and feet on the pandas.  Everything is held together with frosting.

Now is perhaps a good time to admit some other things.  These Pandas looked super cute (see above picture) when I put them in the car to take to Lisas.  Upon arrival at her house, they pretty much all needed major surgery.  I looked over at the passenger seat to find 8 headless Pandas.  Fortunately, they were easily put back together.  But note to the user--I suggest assembling these at the party location, or else having someone carry them in the car, as opposed to letting them bounce away on the pothole-filled drive to your friend's house.

If you like this sort of thing, this book has a lot of very creative ideas to make cute cupcakes with regular ingredients that you can find at most grocery stores.  If you get really into it, there's also a sequel book, "What's New, Cupcake?" that I've heard is also cute.  Both books are about $10 on Amazon (don't forget free 2-day shipping with you free membership in Amazon Mom!) or you could probably find them at your local library.  Or support your local bookstore!


Happy Birthday Lisa!  Happy Creative Endeavors everyone!

Tuesday, January 18, 2011

Garlic update

Hello friends!  So back in November, I decided I'd try my hand at planting some garlic.  You can find that post here.  I thought you might like an update.  It appears that so far, all but one of my garlic cloves have sprouted!  Hooray!  This is what it looked like this morning:


Pretty exciting!  Speaking of garlic, I made some really tasty Empanadas last weekend.  As soon as I get a free chunk of time, I'll get that post up.  I've been too distracted by fun trips to the Aquarium and the Children's museum.  Oh, and I participated in a flash mob.  That was a blast.  More on that later too.  In the meantime,  I hope you all are enjoying this rainy Tuesday!  

Friday, January 7, 2011

Cleaning Tips


Let's be clear, I am the last person on earth who should be giving cleaning advice.  I was the child who was constantly in trouble for leaving messes everywhere, not making her bed, not doing her dishes, etc.  I am the adult who stacks things into (fairly) tidy piles, and tosses all kinds of random stuff that "looks interesting, and I'm sure I'll look at it later" into a drawer, a closet, or the garage.

So all that being said, I obviously joined the throngs of people making plans for 2011 to be the year "I finally get (a little bit) organized!"  And I am going to keep myself honest by documenting a little bit of that here.

A few promises:  If you have problems with cleaning and organization, I do not judge you.  I thank you for likewise not judging me.  Life is a journey.  We can all try to improve.  Also, since I do not come to cleaning or organization naturally, I also can't promise to share anything that you don't already know.  I'll just share tips that I pick up along the way.  And feel free to email me your tips, or post a comment below.  I need help!

OK, so today I did something that I kind of love, but also feel a bit guilty about often times when I do it.  I dropped Elliott off at daycare, and then came back home.  That's right, I didn't go to work.  I just came home.  Today I didn't feel much guilt.  I have gotten a ton done, and the little guy has only been in daycare a few hours.  I'd probably feel more guilt if I came home and just read a book.  Isn't that odd?  Yes, I struggle.

At any rate.  So today I discovered a couple of cleaning tips that surprised me by how well they worked, and I thought I'd share.


TIP #1:  I used a baking soda and water paste to clean my class stove cook top.  Have you done this before?  It worked like a dream!  Admittedly it took a lot (A LOT!) of elbow grease.  But I've been cleaning that stove for the last 5 years with a glass cleaner, and the baking soda paste took off TONS of marks that I had thought were just scratches on the glass.  If you'd like to try this, I used ratio of about 2 parts water to one part baking soda.  I poured it on the stove just as my phone rang.  So it ended up sitting on the stove for about 10 minutes before I started scrubbing.  Not sure if that helped or not.  It seemed like it really was the friction from the baking soda that loosened up all the gunk that I hadn't realized was gunk.  And it didn't scratch my stove, it was cheap, and not chemically!  Woot!

I should mention now, that I have thought about buying one of these to clean the stove.  Has anyone tried it?  If I ever do finally buy one I'll let you know.  In the meantime, baking soda was cheap, and on-hand.  


TIP #2:  I followed these directions to clean out my dishwasher.  This might be one of those times where you look at this link and say, "Where have you been Emily?!  Don't you do that regularly?"  The sad truth is, this is the first time I've cleaned the inside of my dishwasher.  I'm embarrassed to admit we've lived in this house over 5 years.  Better to start now than a year from now though, right?  Especially because I use that thing a ton.  Practically daily since Elliott was born.

OK, those are my tips for today.  Do you have tips to share?  Leave a comment below.  I can use all the help I can get!  Happy Friday!

Wednesday, January 5, 2011

Mom's dinner rolls


Happy New Year!!  I've been away from this blog for a couple weeks, but am happy to report that my absence was the result of a wonderful trip to visit my mom.  

As some of you know, my mom was diagnosed with breast cancer this summer, and has been going through chemo for the past few months.  For me, Mom's cancer diagnosis has challenged me in a number of ways.  First off, cancer forces you to look at your beliefs about death.  No small task.  And talking about death doesn't generally come up in casual conversation.  Frankly, I think most people are uncomfortable with it.  We all want to die peacefully in our sleep.  

At any rate, over the past few months I have come to realize how much I love my mom, how much my relationship with her means to me, and how much I hope to have a similar relationship with my own child (or possible children---dare I even write that?) someday.  We haven't been able to see my mom much recently since our little cutie is exposed to a whole host of germs at daycare.  But Gramma decided to take a risk for Christmas!  So exciting!


I have always enjoyed cooking with my mom.  As Elliott is getting bigger, I've started pulling a chair into the kitchen so he can cook with me.  I have memories of doing this with my mom when I was young.  I also vividly remember the time she let me make playdough by myself and I melted her Tupperware bowl all over the stove.  Oops.  Fortunately I didn't burn the house down.

This year our cooking endeavors have been a bit more modest.  My mom often makes whole wheat rolls and grinds her own flour, using wheat we harvest each summer at the family farm (now you know why I think she's secretly super-woman).  This year, she tried a new recipe.  And it was great!  Mom doubled the original recipe, and we had rolls for days.  There were 13 adults and 5 children at our Christmas dinner, but we were eating sandwiches for the rest of the weekend (yum!).  Just a tip, in case you have leftovers, or decide to make a double recipe!

Here's the basics:

Proof your yeast.  Then add sugar, butter, an egg and mix it up.  Add whole wheat flour too.  Sorry for the lack of pictures.  I was attempting to entertain a cute toddler at this point.  Yes, he is drinking water out of a shot glass.  Apparently mama forgot the sippy cup.  You'll be happy to know it's just water.  And that his hair is always that messy when he wakes up. 


OK, back to the bread.  Then keep adding all purpose flour and mixing until you form a dough.  Turn it out on a lightly floured surface and start kneading until it's smooth and elastic.  Then let it rise until doubled.  Punch the dough down and let it rise a second time.  Now we rejoin pictures!

Punch down the dough.  Divide into two part and roll out into a circle:


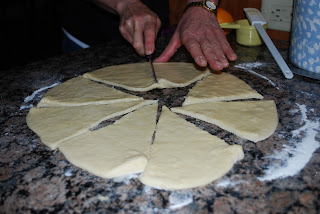
Cut the circle into 8 "slices":
Then roll up into rolls:

Place rolls on baking sheet and allow to rise until doubled.  You can then repeat these steps with the other half of dough.  (Or other 3 parts of dough if you doubled the recipe)


Bake at 400 for 12-15 min and enjoy.

One more comment.  I can remember when I was little, my mom talked about how glad she was that I had my grandma's hands.  Apparently my grandma's hands "aged well" whereas my mom thought she had "old lady hands" at a young age.  In looking at the above pictures, I have to say that I think Mom's hands are beautiful.  I think they're the hands of someone who has worked hard her whole life, and is pretty darn good at just about everything she does.  I love you Mom!!

Mom's Dinner Rolls
Adapted from All Recipes

Ingredients

  • 2 (.25 ounce) packages active dry yeast
  • 1 3/4 cups warm water (110 degrees F/45 degrees C)
  • 1/2 cup white sugar
  • 1 teaspoon salt
  • 1/4 cup butter, melted and cooled
  • 1 egg, beaten
  • 2 1/4 cups whole wheat flour
  • 2 1/2 cups all-purpose flour
Melted butter to brush on the tops of the rolls (Unless Mom did this at lightning speed while I was brushing my teeth, I believe we skipped this step---Mom's never one for extra calories!).


Directions

  1. In a large bowl, dissolve yeast in warm water. Let stand until creamy, about 10 minutes.
  2. Mix sugar, salt, 1/4 cup melted butter, egg, and whole wheat flour into yeast mixture. Stir in all-purpose flour, 1/2 cup at a time, until dough pulls away from the sides of the bowl. Turn dough out onto a well floured surface, and knead until smooth and elastic, about 8 minutes. Lightly oil a large bowl, place dough in bowl, and turn to coat. Cover with a damp cloth, and let rise in a warm place until doubled in volume, about 1 hour.
  3. Punch down dough, cover, and let rise in warm place until doubled again, about 30 minutes.
  4. Punch down dough, and divide into two equal portions. Roll each into a circle, and cut circle into eight slices. Roll pieces up into spirals, and place on baking sheets. Brush tops with melted butter (optional). Let rise uncovered in a warm place 40 minutes, or until doubled in bulk.
  5. Preheat oven to 400 degrees F (200 degrees C). Bake for 12 to 15 minutes, or until golden brown. Remove from oven, and brush again with melted butter (optional).